How To Make a Gender Reveal Video Online
Creating a gender reveal video online is a simple way to share a special moment with loved ones, no matter where they are. Here's the process in a nutshell:
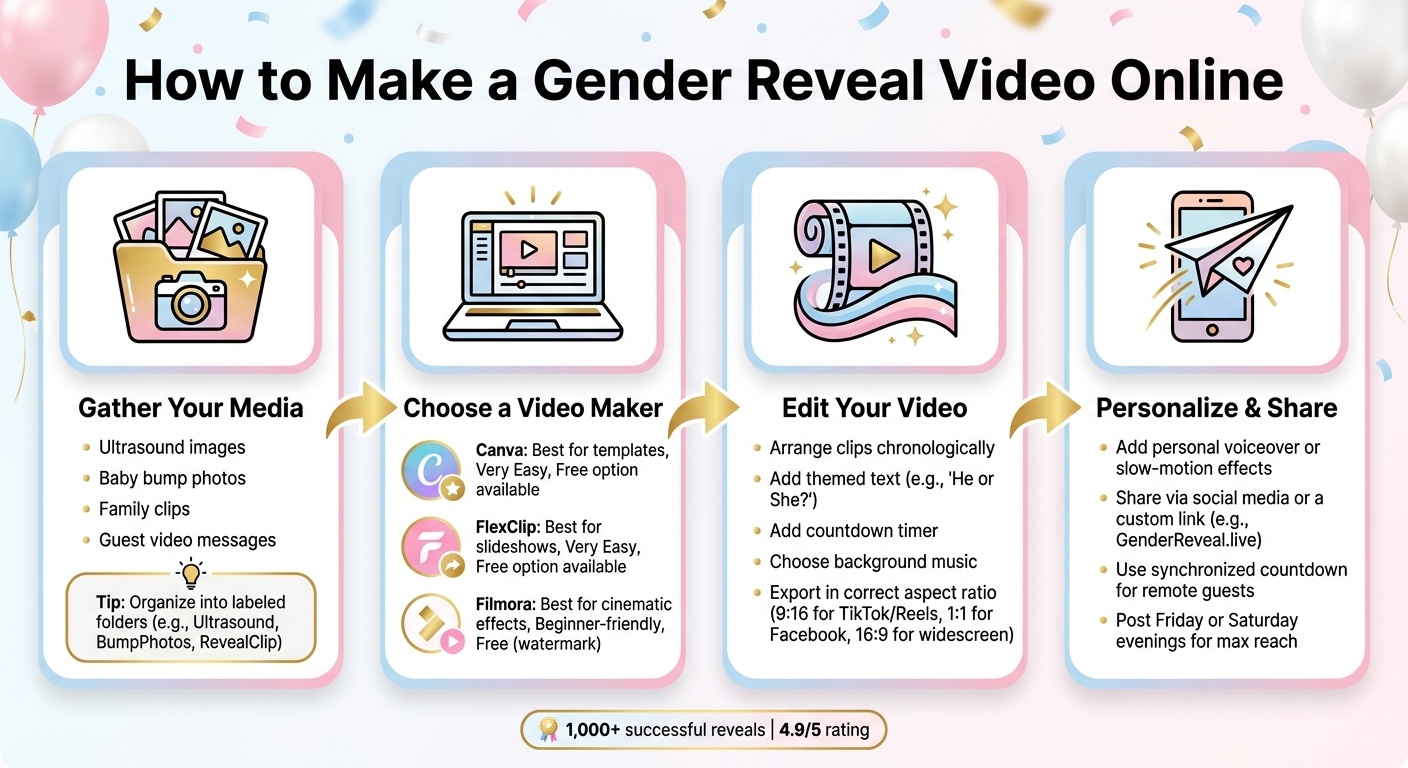
- Collect Media: Gather ultrasound images, baby bump photos, and family clips. Organize them into folders for easy editing.
- Pick a Video Maker: Use tools like Canva, FlexClip, or Filmora for drag-and-drop editing, themed templates, and music integration.
- Edit Your Video: Arrange media in order, add text like "He or She?", use countdowns for suspense, and choose background music.
- Share the Video: Export in formats ideal for social media (e.g., vertical for TikTok). Platforms like GenderReveal.live offer features like live voting and synchronized countdowns.
This approach lets you create a meaningful keepsake while involving friends and family in the celebration, whether near or far.
How to Make a Gender Reveal Video Online: 4 Simple Steps
Step 1: Gather Your Photos, Videos, and Ideas
Before diving into video editing tools, start by collecting the media that will bring your video to life. The right photos and videos can create a strong emotional connection and make your reveal unforgettable.
Collect Meaningful Media
Begin with the essentials: ultrasound images, baby bump photos, and family snapshots. These visuals lay the groundwork for your story, capturing the journey leading up to this special moment. Want to add a dramatic flair? Include clips of confetti cannons or smoke bombs for a cinematic touch, or explore other creative gender reveal ideas to capture. Close-up shots of themed jewelry or painted baby bumps can add a creative and personal element. Don’t forget audio! Short video messages or heartfelt wishes from grandparents, siblings, or close friends can amplify the emotional impact.
Once you’ve gathered everything, the next step is to get organized for a seamless editing process.
Organize Files Before You Start Editing
Having your media sorted ahead of time can save you a lot of headaches. Create clearly labeled folders for each type of content - like "Ultrasound", "BumpPhotos", "RevealClip", and "GuestMessages." This way, everything you need is easy to find when you start editing. If you’re planning to include captions or text overlays (like "Team Boy" or "Team Girl"), jot those down in advance.
Music is another crucial element. Pick your background track early on - something soft and emotional works beautifully for the buildup, while an upbeat song is perfect for the big reveal. For royalty-free music, check out platforms like Pexels, which offer free options compatible with most editing tools.
Plan the Reveal Moment
The reveal itself is the highlight of your video, so it’s worth planning every detail. Use a countdown timer to build anticipation, and consider slow-motion effects or digital overlays (like fireworks or balloons) to make the moment even more striking. By mapping out the sequence ahead of time, you’ll know exactly where each clip fits, making the editing process smoother and less stressful.
sbb-itb-bc05356
Step 2: Choose the Right Online Video Maker
Now that you've gathered your media (as outlined in Step 1), it's time to pick the right tool for the job. The good news? You don’t need any prior design or editing experience. Modern online video makers are designed with everyday users in mind, making it easier than ever to execute online gender reveal ideas. Let’s dive into the key features to consider when choosing a platform.
Features to Look For
A user-friendly interface is a must, but there are other features that can make your editing process smoother and more enjoyable:
- Drag-and-drop editing: Simplifies the creation process by letting you move elements around easily.
- Gender reveal or baby-themed templates: Look for pre-designed options with pink and blue themes, confetti, balloons, or other celebratory elements to save time.
- Integrated music libraries: Royalty-free tracks can help set the perfect mood for your video.
- Special effects: Features like fireworks, smoke, or countdown timers can add a dramatic touch to your reveal.
- Vertical export options (9:16): Perfect for sharing your video on social media platforms.
Also, check if the free version of the platform includes a watermark on exported videos. Some tools require a paid subscription to remove it.
Popular Video Editing Platforms
Here are three popular platforms that are perfect for creating gender reveal videos:
| Platform | Best For | Ease of Use | Free Option |
|---|---|---|---|
| Canva | Template-based design | Very easy | Yes (Pro plan for advanced templates) |
| FlexClip | Quick drag-and-drop slideshows | Very easy | Yes (some templates require payment) |
| Filmora | Cinematic effects & AI tools | Beginner-friendly | Yes (watermark on free exports) |
- Canva: This is a fantastic option if you’re looking for a quick, polished result. Its searchable “Gender Reveal Video” templates let you easily customize with your own photos and text.
- FlexClip: Ideal for combining ultrasound images and pregnancy photos with smooth, animated transitions.
- Filmora: Offers advanced features like AI-powered tools, including Smart Cutout (perfect for blurring background distractions) and Sky Replacement for outdoor shots. It also has built-in countdown timer effects to add excitement.
"A well-made video turns your reveal into a keepsake you'll cherish forever." - James Hogan, Filmora
Each of these platforms works either in a browser or as a desktop app, giving you the flexibility to edit on the device that’s most convenient for you. Choosing the right platform will make creating your gender reveal video both easy and enjoyable.
Step 3: Create Your Gender Reveal Video
Now that you've chosen your platform, it’s time to dive into creating your video. This is where the magic happens, and the process is easier than you might think, especially when using creative online gender reveal ideas to guide your vision.
Upload and Arrange Your Media
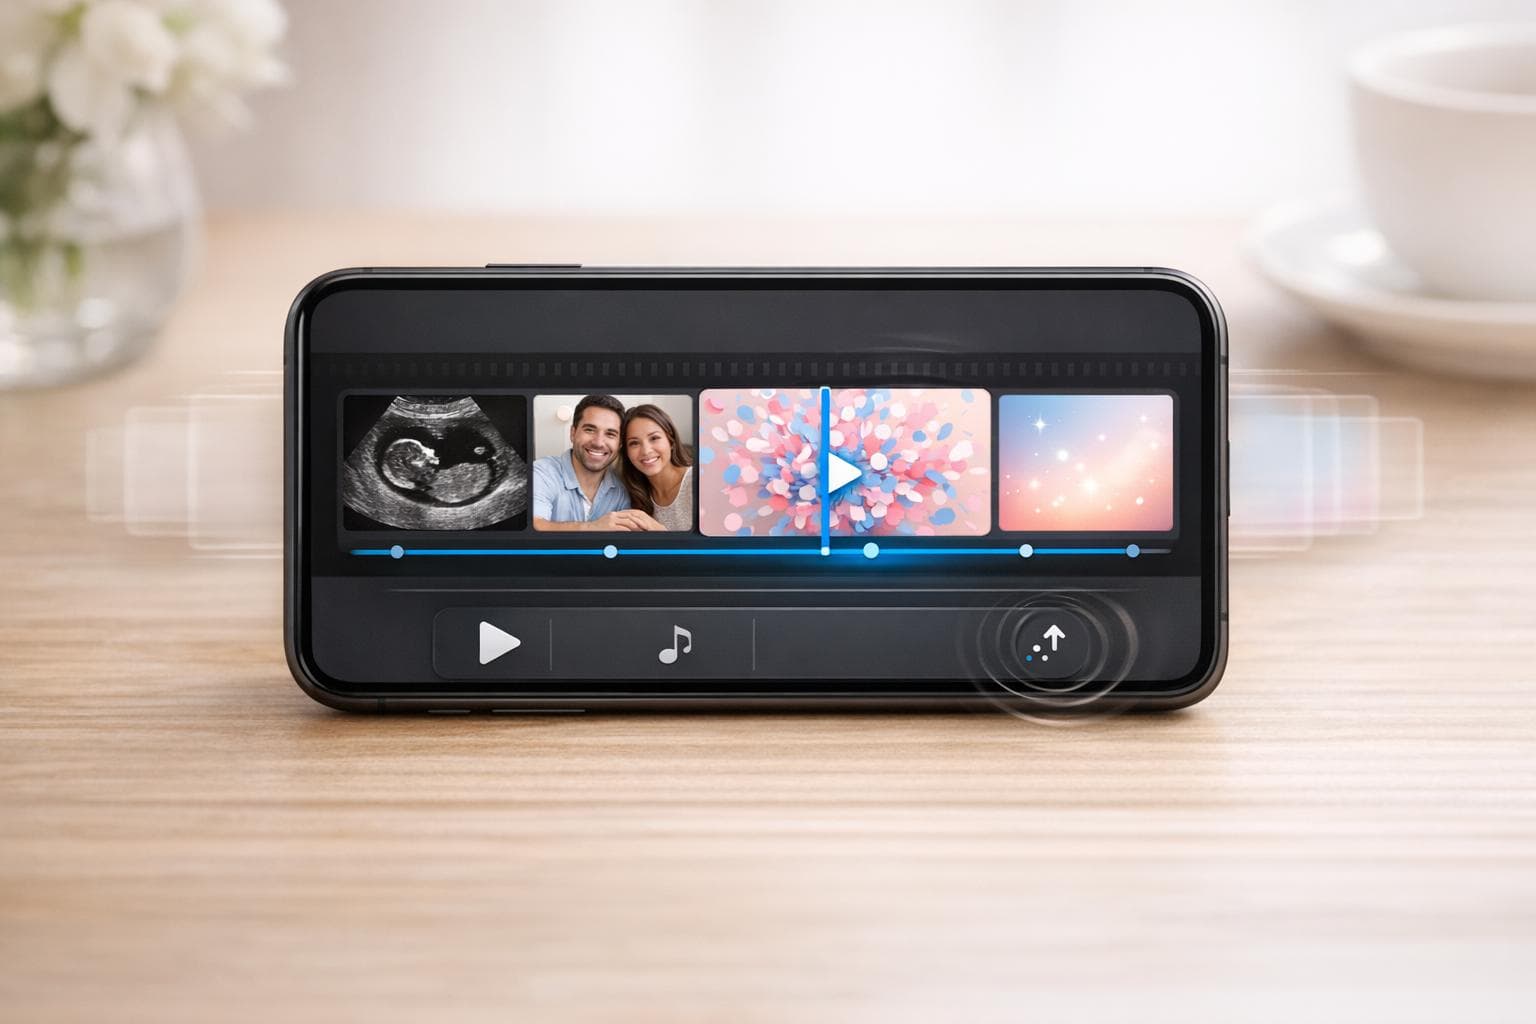
Start by importing your media into your video editor. Use the "Import Media" option or simply drag and drop your files into the editor. Once uploaded, your photos and video clips will appear in a media library, ready to be added to the timeline.
Arrange your clips in chronological order to tell a cohesive story. Begin with moments from early pregnancy and lead up to the reveal itself. Adjust the length of each clip, trim where necessary, and reorder them until the flow feels natural. The idea is to build anticipation - each moment should lead seamlessly into the next, creating excitement for the big reveal.
Once your media is in place, it’s time to add the elements that make your video truly special.
Add Themes, Text, and Music
This is where your slideshow transforms into a memorable gender reveal video. Choose a themed template to set the tone - styles like Boho, Floral, Celestial, or Nautical can give your video a polished and cohesive look without much effort. To heighten the excitement, layer in gender-specific effects like blue fireworks, pink confetti, or whimsical balloon overlays. You can also add fun stickers, such as "Little Prince" or "Little Princess", and include a countdown to build suspense.
Incorporate brief, meaningful text to guide viewers through the story. For example, a title card that says "He or She?" at the start sets the stage beautifully. Pair your visuals with music that matches the mood - soft, emotional tracks work well for reflective moments like ultrasound clips, while upbeat songs are perfect for the reveal itself. Many platforms even offer AI tools to generate custom background music tailored to your video’s length and energy.
Every choice you make - whether it’s the order of clips, the effects, or the soundtrack - helps craft a video that’s both engaging and personal.
Preview and Make Final Edits
Before wrapping up, take the time to preview your video carefully. Watch it through at least twice, paying attention to how the music, transitions, and countdown align with the visuals. Adjust the timing of clips and transitions as needed to ensure everything flows smoothly and the reveal lands with maximum impact.
Double-check your transitions - effects like Glitter, Light Leaks, or Dissolves should feel seamless between clips. If you’ve added overlays like smoke or confetti, make sure they blend naturally with your footage rather than standing out awkwardly. Adjusting opacity levels can help these elements feel more integrated.
Export and Save Your Video
Before exporting, confirm that your video’s aspect ratio matches the platform where you plan to share it. For example:
- Vertical (9:16) for TikTok or Instagram Reels
- Square (1:1) for Facebook posts
- Widescreen (16:9) for TV or laptop displays during virtual events
Export your video at the highest resolution possible to ensure it looks great on any screen. Don’t forget to save a backup copy in cloud storage - you’ll want to keep this special memory safe for years to come.
Step 4: Personalize and Share Your Video
With your video polished and ready, it’s time to make it uniquely yours and share the excitement with friends and family.
Add Personal Touches
Make your gender reveal video truly stand out by adding elements that reflect your personality and journey. Consider including clips of loved ones sharing their guesses - this adds a heartfelt and relatable touch. You could also record a short voiceover to narrate the story, from discovering the big news to planning the reveal.
For an extra layer of creativity, use an AI music generator to create a custom soundtrack that sets the mood. Slow-motion effects can also enhance the dramatic moment of the reveal, whether it's a confetti explosion, a balloon pop, or colorful smoke filling the air.
Once your video feels like a reflection of your story, it’s time to share the joy.
Share Your Video Effectively
To make the most of social media, export your video in vertical (9:16) or square (1:1) formats, which work best on platforms like Instagram, TikTok, and Facebook. For a more personal touch, websites like GenderReveal.live let you create a unique link - such as babysmith.genderreveal.live - making it easy for everyone, even less tech-savvy family members, to watch and celebrate.
Timing is everything. Posting on Friday or Saturday evenings can help you reach the most viewers, as people are often more active online then. If you’d like everyone to experience the reveal together, no matter where they are, use a synchronized countdown feature. This way, everyone can share the excitement of the big moment at the same time, even miles apart.
Spotlight: Take Your Reveal Further with GenderReveal.live

Your gender reveal video is a beautiful moment, but GenderReveal.live takes it up a notch by turning it into an interactive celebration. With features like live voting, RSVP tools, and digital keepsakes, it’s designed to bring everyone together - no matter where they are.
Interactive Features for Virtual Events
This platform makes sure your guests feel involved from start to finish. Before the big moment, they can cast their votes for Team Boy or Team Girl using live prediction voting. Real-time stats and leaderboards add an extra layer of excitement and competition. Plus, a synchronized countdown timer ensures that everyone, whether near or far, experiences the reveal at the exact same time.
When it’s time for the reveal, you can skip the traditional props and go digital. Games like Balloon Pop, Mystery Box, and Spin the Wheel add an interactive twist, complete with fun sound effects. And if you want to keep the surprise genuine, Trustee Mode allows a trusted person to securely input the gender result so you can enjoy the reveal right alongside your guests.
"The countdown timer and prediction feature made our reveal so much fun. Everyone was on the edge of their seats!" - Jessica & David
With over 15 themed templates to choose from, you can match the platform's look to your event's vibe.
Stress-Free RSVP Management
Guest lists can be a hassle, but GenderReveal.live simplifies the process. Its RSVP system includes email verification, real-time tracking of guest responses, and automated reminders to make sure no one forgets the event. You can even customize the RSVP form to collect special requests, all in one easy-to-manage space.
Once your guest list is sorted, you’re free to focus on enjoying the big day and capturing every heartfelt moment.
Turn the Celebration Into a Keepsake
The fun doesn’t stop when the confetti settles. With the Baby Wishes feature, the platform gathers heartfelt messages and blessings from your guests, creating a downloadable digital guestbook you can treasure forever. Guests can also upload photos to a shared gallery, making sure no memory is left behind.
"The reveal was absolutely perfect! Our family and friends loved the interactive experience, even those who couldn't be there in person." - Sarah & Mike
Relive the joy of your celebration anytime with your personalized digital keepsake. It’s a perfect way to hold onto the magic of the day.
Conclusion: Share Your News with a Custom Gender Reveal Video
Making a gender reveal video online is straightforward: gather your favorite photos and clips, pick a platform that works for you, organize your media, add music and text, and share it with your loved ones.
But what makes these videos truly special is the emotional connection they create. A custom gender reveal video goes beyond just announcing the news - it captures the joy and anticipation in a way no text or phone call ever could. As author James Hogan aptly said, a gender reveal video "catches feelings, enthusiasm, and expectation, therefore transforming the occasion." It’s not just about telling people; it’s about sharing the moment.
Thanks to technology, celebrating together doesn’t have to be limited by distance. A single link can bring everyone together, whether they’re across town or across the country. With over 1,000 successful reveals and an impressive 4.9/5 rating, GenderReveal.live adds interactive features like interactive voting ideas and digital keepsakes to make your announcement even more memorable.
So, why wait? Start gathering your media, pick one of many virtual gender reveal themes, and create a video that celebrates your baby’s story in a way everyone can enjoy - no matter where they are.
FAQs
How long should a gender reveal video be?
There's no hard rule for how long a gender reveal video should be, but keeping it short and engaging is a smart move. Aiming for 1 to 3 minutes is ideal - it’s enough time to capture the excitement, highlight the reveal, and keep viewers hooked without dragging things out. This length allows you to create something fun and visually captivating while maintaining the energy of the moment.
What’s the best format to export for TikTok, Instagram, and Facebook?
The best format for exporting your gender reveal video to platforms like TikTok, Instagram, and Facebook is MP4. This format strikes a good balance between quality and file size, making it widely compatible across these platforms.
To get the best results, stick to these dimensions:
- Vertical videos: Use 1080x1920 pixels, perfect for TikTok, Instagram Stories, or Reels.
- Square videos: Opt for 1080x1080 pixels, which works well for Facebook posts.
Make sure to compress your video so it stays within platform file size limits while still looking sharp.
How can I keep the reveal a surprise for me, too?
If you want to keep the reveal a surprise for yourself, take advantage of tools designed for private reveals. Platforms like GenderReveal.live provide fun options like balloon pops, mystery boxes, or spin-the-wheel games that keep the secret hidden until the big moment. You can even plan to unveil the surprise live during your event, letting you and your guests share the excitement together in real time.