How to Set Up a Virtual Gender Reveal Stream
A virtual gender reveal stream is a fun way to share your baby's gender with friends and family, no matter where they are. Here's how to make it happen:
- Choose Your Platform: Opt for a user-friendly, event-focused platform like GenderReveal.live, which offers features like live polls, countdown timers, and themed templates.
- Set Up Your Camera and Lighting: Position your camera at eye level, ensure good lighting, and test your setup for clear visuals.
- Engage Guests with Interactive Features: Include live voting, games, and a countdown timer to keep your audience involved.
- Send Invitations and Track RSVPs: Use online invitations and RSVP tools to manage your guest list and provide clear instructions for joining.
- Test Everything in Advance: Rehearse your event to avoid technical glitches and have a backup plan ready.
- Record and Share the Event: Capture the stream for memories and share highlights with those who couldn’t attend.
With these steps, you can create a memorable and engaging virtual celebration that connects everyone, no matter the distance.
6 Steps to Set Up a Virtual Gender Reveal Stream
GENDER REVEAL! virtual gender reveal on zoom

sbb-itb-bc05356
Step 1: Pick Your Streaming Platform
The platform you choose sets the tone for your event - not just for you, but for every guest who joins. A good platform ensures everything runs smoothly, while a poor choice could lead to frustrating delays or interruptions.
Compare Platform Features
While general video conferencing tools can get the job done, they’re not designed for celebrations. Using them often means juggling multiple apps for polls, timers, and managing guests, which can make things unnecessarily complicated.
On the other hand, platforms specifically built for events take the experience to another level. For example, GenderReveal.live (https://genderreveal.live) is tailored for these moments and has earned a 4.9/5 rating from over 1,000 gender reveals. It offers features like Trustee Mode, which allows a trusted friend or doctor to securely input the baby’s gender so you can enjoy the surprise with your guests. Plus, it includes interactive elements like live prediction voting, synchronized countdown timers, and games like Balloon Pop or Spin the Wheel. You’ll also find themed templates - options like Boho, Celestial, and Floral - and the ability to collect digital "Baby Wishes" from your guests as a keepsake.
"The reveal was absolutely perfect! Our family and friends loved the interactive experience, even those who couldn't be there in person." - Sarah & Mike, New York, USA
Another standout feature is the platform's RSVP management, which automatically tracks guest lists and attendance, saving you from the hassle of chasing responses.
Once you’ve chosen a platform, double-check that it works smoothly across all devices your guests might use.
Check Device and Internet Compatibility
Keep in mind that your guests may join from a wide range of devices. Opt for a browser-based platform that doesn’t require downloads or account sign-ups, making it easy for everyone to join with just a click. Test the platform on different devices - like an iPhone, an Android tablet, and a desktop computer - to ensure everything works seamlessly.
Also, test your internet speed ahead of time to avoid lag or interruptions. If you’re using a more generic platform, consider assigning a co-host to handle any technical issues, like audio or video glitches, so you can focus on enjoying the moment. To minimize confusion, send guests event email templates or a simple "how-to" guide at least a week before the event. Include clear instructions, such as "Click here at 3:00 PM ET on Saturday", to make joining the stream as easy as possible.
Step 2: Set Up Your Camera and Lighting
Once you've chosen your platform and ensured your device is ready, it's time to focus on a setup that grabs attention. A polished visual presentation will enhance your reveal and keep your guests engaged.
Clear, well-lit video is key to capturing every magical moment - whether it's the confetti bursting or the balloon popping. Your guests want to feel like they're right there with you.
Position Your Camera
Place your camera at eye level for a natural and inviting perspective. Make sure the frame includes both your reveal props (like a confetti cannon or balloon box) and your faces. This balance ensures every detail of the moment is visible.
To keep your shot steady, use a tripod. Your primary camera - whether it's a smartphone, laptop, or a budget-friendly 1080p webcam (around $100) - should capture the entire scene clearly. If possible, set up a second device to record your guests' reactions. This way, you can focus on enjoying the moment while still capturing every angle.
A steady, well-framed shot is the foundation of a memorable reveal.
Improve Your Lighting
Good lighting makes all the difference, and natural light is the easiest and most effective option. Plan your stream for a weekend afternoon, ideally between 1:00 PM and 4:00 PM, when daylight is strongest. Position yourself so you're facing a window, allowing the light to illuminate your face. Avoid having light sources behind you, as they can cast shadows and make your face harder to see.
If natural light isn't available, a ring light or LED spotlight with adjustable brightness can help eliminate shadows. Even a simple front-facing lamp can improve your video quality. For a touch of flair, consider using a reflective backdrop that adds a bit of sparkle without distracting from your setup. Before going live, do a quick run-through to ensure your lighting highlights both your expressions and the reveal details.
With the right camera placement and lighting, your stream will look polished and professional, creating a visually stunning reveal that your guests will love.
Step 3: Add Interactive Features for Guests
With your camera and lighting ready to go, it’s time to take your livestream to the next level. The key? Turning your viewers from passive spectators into active participants. Interactive features can transform your event into a lively, shared celebration where everyone - no matter the distance - feels like they’re part of the action.
These features work hand-in-hand with the tech setup you’ve already put in place. The idea is to keep your guests engaged and excited throughout the event. Whether it’s through voting, games, or a countdown timer, these tools make remote attendees feel like they’re right there with you. Let’s dive into how you can make this happen!
Set Up Live Voting and Prediction Games
Want to spark some friendly competition? Let your guests cast their votes for "Team Boy" or "Team Girl" before the big reveal. Real-time voting adds an extra layer of excitement, especially when you display live stats that show the results as they come in.
To get everyone involved, send out voting links 2–3 weeks before the event. Platforms like GenderReveal.live make this easy with built-in prediction polls that update instantly. Beyond the basic polls, you can also add online gender reveal games like:
- Balloon Pop: Guests watch digital balloons burst until the gender is revealed.
- Mystery Box: Players pick a box to unveil the surprise.
- Spin the Wheel: An animated wheel builds suspense before landing on the result.
If you want to keep the reveal a surprise for yourself, you can use Trustee Mode to ensure the outcome stays hidden until the big moment.
"The predictions feature made it so much fun for everyone involved!" - Emma & James, London
Create a Countdown Timer
A countdown timer is a great way to build anticipation and make sure all your guests experience the reveal at the same time. Display the timer prominently on your streaming page so everyone knows when to tune in. To keep the energy up, plan short interactive activities every 15–20 minutes while the timer ticks down. This pacing helps keep the celebration lively and prevents screen fatigue, especially since virtual events usually last around 1.5 to 2 hours.
While the countdown adds to the suspense, encourage guests to leave “Baby Wishes” or heartfelt messages on your reveal page. These messages can be compiled into a digital keepsake that you’ll treasure long after the event. Pair this with festive digital décor to set the mood and make the moment even more special.
Choose Themed Templates and Backgrounds
Your virtual space should reflect the excitement of the occasion. With just a click, you can transform your stream with themes that match your party’s vibe. Popular options for 2025–2026 include:
- Celestial: Think stars, moons, deep blues, and gold for an elegant evening reveal.
- Boho: Earthy tones and natural textures for a laid-back, trendy feel.
- Floral: Soft pastels and garden-inspired details, perfect for springtime.
- Rustic: Warm wood textures and cozy lighting for an at-home celebration.
- Nautical: Anchors and navy stripes for a timeless, classic look.
Pick a theme that suits your personality to create a polished, cohesive digital space - no design experience needed!
Step 4: Send Invitations and Track RSVPs
It’s time to invite your guests and keep track of who’s joining. A smooth invitation process ensures everyone knows when and how to participate, while also making it easier for you to manage the guest list. Using a dependable RSVP tool, like the one from GenderReveal.live, can simplify the process for both you and your guests.
Use RSVP Management Tools
Gone are the days of juggling spreadsheets and chasing down responses. With GenderReveal.live, you get built-in RSVP management that organizes attendee information into a real-time guest list. The tool even includes email verification, so you can be confident the responses are genuine and not spam. Plus, you can customize RSVP forms to collect useful details, like mailing addresses for sending favors or dietary preferences for hybrid events.
To keep things on track, send out invitations 3–4 weeks in advance. If your event falls on a holiday weekend, give your guests extra notice - 6–8 weeks is ideal. About a week before the big day, confirm your final RSVPs and send a quick tech guide. Include the streaming link and a brief tutorial on how to access the platform. This small step can help avoid any last-minute connection hiccups and ensures everyone knows how to join. The RSVP link is accessible on any device and doesn’t require downloads, making it easy for guests to respond.
Schedule Around Time Zones
Timing is everything, especially for virtual events. A weekend afternoon, such as 1:00–4:00 PM, works well for most schedules. Be sure to clearly state the time zone (e.g., "Saturday, March 15, 2026, at 2:00 PM EST") so everyone logs in at the right time.
Keep the celebration short and sweet - 1.5 to 2 hours max - to avoid screen fatigue. To make the big reveal extra special, use the synchronized countdown timer on your event page. This ensures that guests, no matter where they’re watching from, experience the reveal moment together. It’s a simple touch that makes everyone feel part of the excitement.
Step 5: Test Everything Before the Event
You've put together the perfect plan for your online gender reveal, but don’t skip the rehearsal. Testing everything in advance is your best chance to catch any hiccups, tweak camera angles, and build confidence before showtime. Think of it as your safety net - because no one wants to spend the main event troubleshooting.
Do a Complete Rehearsal
Schedule a full rehearsal at least two to three days before your event. Invite a trusted friend or family member to join a test stream and help you check for clear audio, sharp video, and properly functioning interactive features. If you're using props like confetti poppers or smoke bombs, make sure your camera is positioned to capture the entire moment. You don’t want half the confetti flying out of the frame.
Double-check that your microphone is working well and that your internet connection can handle the stream. If the event is outdoors, test everything at the same time of day you plan to go live. Lighting and Wi-Fi strength can vary, and testing under the same conditions ensures you’re prepared. This rehearsal connects all the dots between your planning and the live event, giving you peace of mind.
Have a Backup Plan Ready
Even if your rehearsal goes off without a hitch, it’s smart to have a backup plan for unexpected issues. Be ready for technical glitches by keeping a second device - like a tablet or spare phone - fully charged and logged into your streaming platform. If your main camera freezes or your connection drops, you can switch devices quickly and keep the event rolling.
Assign someone other than the parents-to-be to act as a co-host. This person can manage the stream, admit guests, and troubleshoot any problems, leaving you free to enjoy the moment. If your event is outdoors, have an indoor backup location ready to go. And keep a list of emergency contacts handy - whether it’s a tech-savvy friend or your platform’s support team - so you can get help fast if needed.
As GenderReveal.live wisely advises, "Successful virtual baby showers require careful planning: choose a reliable platform... have a co-host for technical support, and prepare backup activities for technical difficulties."
Step 6: Record and Share the Reveal
Capturing your reveal on video creates a keepsake you can treasure forever and allows guests who couldn’t join live to experience the moment. Many platforms, like Zoom and Google Meet, come with built-in recording options you can activate with a simple click. There are also specialized platforms, such as GenderReveal.live, that offer recording features tailored to highlight both the reveal and interactive elements like live polls or countdowns. These recordings preserve not just the big moment, but also the excitement and reactions that make it special.
Record Your Livestream
Let your guests know ahead of time that the event will be recorded and make sure to get their consent. During your rehearsal (ideally about a week before the event), test the recording function to ensure everything works smoothly. It’s also a good idea to assign a co-host who can oversee the technical aspects, like managing recordings and troubleshooting.
For added security, set up a backup recording. A smartphone on a tripod works well for this - just make sure all your devices are fully charged or connected to power. Once the event is over and the recording is safely stored, you can move on to sharing the highlights.
Share Photos and Videos After the Event
Once the reveal is complete, upload your recording to a cloud storage service and share the link with your guests. To make it even more engaging, create a short highlight reel (around three to five minutes) that captures the most exciting moments - perfect for sharing on social media.
Consider using shared photo albums or platforms where guests can upload their own photos and reaction videos from the event. For example, GenderReveal.live collects "Baby Wishes", heartfelt messages from your guests, which you can download as a cherished keepsake. It’s also helpful to designate someone as your event photographer to take screenshots of guest reactions during the livestream. That way, the parents can stay fully immersed in the moment without worrying about missing anything.
Conclusion
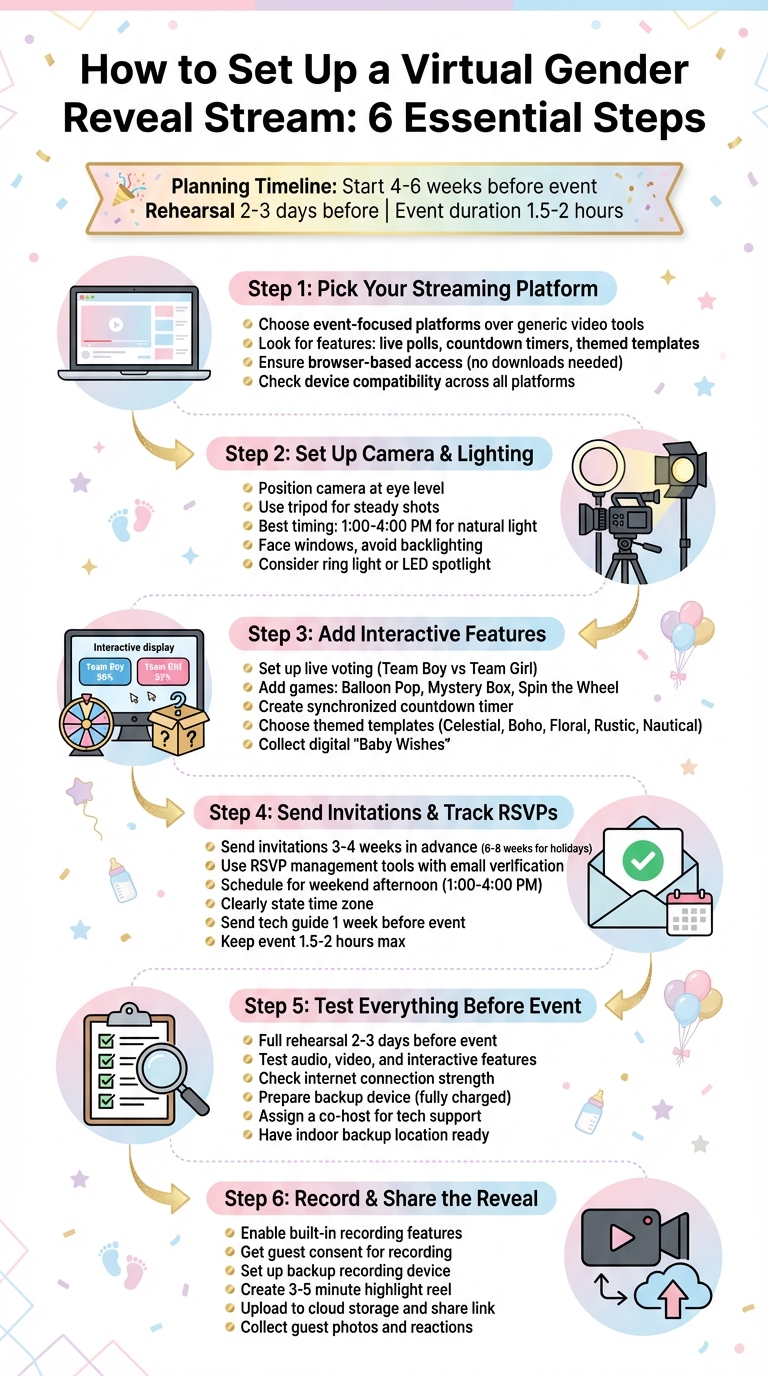
Now that we've walked through everything - from picking the right platform to sharing the highlights after the event - let's see how it all fits together. The process boils down to six key steps: select your platform, optimize visuals, engage your guests, manage RSVPs, test your setup, and capture the big moment. With these steps, you’ve already set the stage for an event that connects guests from all over the world.
Timing is everything. Start planning about 4–6 weeks before the big day to handle time zone coordination and test your tech setup. A quick rehearsal 1–2 days in advance can help iron out any last-minute glitches and boost everyone’s confidence.
Adding interactive features turns your virtual event into a truly engaging experience. These elements ensure your remote guests feel like active participants, not just spectators.
To make things even easier, consider using a platform like GenderReveal.live. It simplifies RSVP tracking and offers tools like countdown timers, live voting, themed templates, and a digital "Baby Wishes" collection. These features make it simple to create a memorable and interactive celebration.
With everything carefully planned and in place, your virtual gender reveal is set to be a fun, seamless, and unforgettable event for everyone involved.
FAQs
How can I make sure my virtual gender reveal works seamlessly on all devices?
To make sure your virtual gender reveal looks great on any device - whether it's a phone, tablet, laptop, or desktop - there are a few simple steps you can take to prepare and test everything ahead of time.
- Pick a dependable platform like GenderReveal.live. It automatically adjusts your event page to fit any screen size and includes helpful features like RSVP tracking and countdown timers.
- Test your setup beforehand. Check your internet connection (a wired connection is ideal, but Wi-Fi with at least 5 Mbps upload speed works too), as well as your camera, lighting, and microphone. Open the event link on multiple devices, such as a phone, tablet, and laptop, to ensure it displays properly across the board.
- Rehearse with a friend or co-host. Use this time to try out interactive features like live polls or reveal animations. Ask them to switch devices during the test to confirm everything runs smoothly when guests do the same.
Start your stream a few minutes early and include clear instructions in your invitations - such as the event time and which browsers work best. These steps will help avoid last-minute hiccups and ensure your celebration is seamless for all your guests, no matter how they tune in!
How can I make my virtual gender reveal fun and engaging for guests?
To make your virtual gender reveal truly memorable, focus on creating interactive experiences that keep your guests engaged and entertained. Start by using RSVP tools to handle attendance effortlessly - these tools can send automated reminders and even track a live guest count during the event. Add some fun by setting up prediction polls where guests can guess the baby’s gender. Displaying live poll results amps up the suspense, while a countdown timer leading up to the big moment ensures everyone stays glued to their screens.
Take it up a notch with games like Balloon Pop or Spin the Wheel - both of which are easy to play on any device, so no one feels left out. After the reveal, share a private photo gallery featuring captured live reactions so everyone can relive the joy. To keep the energy high, aim for a session that lasts about 60 to 90 minutes. Wrap up the celebration by sending personalized thank-you notes and giving a special shoutout to poll winners. These thoughtful touches will leave your guests with lasting memories of your special day!
What should I do to prevent technical issues during my virtual gender reveal stream?
To make sure your virtual gender reveal goes smoothly, start by testing your entire setup 1-2 days before the big day. This gives you time to spot and fix any audio, video, or connection hiccups. It’s also a good idea to remind your guests to check their microphones, cameras, and internet connections in advance to avoid any last-minute tech issues.
For a reliable stream, use a stable internet connection - ideally a wired one - and have a backup option, like a mobile hotspot, ready just in case. Platforms such as GenderReveal.live can simplify things with features like automated guest reminders and a "mute all" button to maintain order during the event. Assigning a co-host to handle tech glitches or manage the chat can also help everything run more smoothly.
Lastly, consider creating a pre-recorded version of your reveal moment as a backup. If a live mishap happens, you can calmly update your guests through the chat and keep the celebration on track. These steps will help ensure a fun and stress-free experience for everyone.